Lambda
1 Lambda
- 하나의 메소드를 가진 인터페이스를 구현할 때 별도의 클래스 파일을 만들어서 구현해야 될까?
FunctionalInterface Runnable
- 추상 메소드를 하나만 가진 인터페이스를
FunctionalInterface라고 한다 - 아래의 인터페이스를 구현해보자
@FunctionalInterface
public interface Runnable {
       public abstract void run();
}
1.1 별도 클래스 작성
- Runnable 인터페이스를 구현하는 별도의 클래스 파일 작성하고 사용하기
- 우리는 메소드 하나 실행하고 싶은데 별도의 클래스를 만들어서 사용하기 불편하다.
Runnable 인터페이스 구현 클래스
class RunnableImpl implements Runnable {
  @Override
  public void run() {
    System.out.println("hello");
  }
}
@Test
void testRunnableImpl() {
  Runnable runnable = new RunnableImpl();
  runnable.run();
}
1.2 Anonymous Class 이용
- Anonymous-Class.md
- 별도 클래스 파일 생성 없이 익명 클래스 사용
Runnable 인터페이스의 익명 구현 객체를 생성하는 코드
@Test
void testRunnableAnonymousClass() {
  Runnable runnable = new Runnable() {
    @Override
    public void run() {
      System.out.println("hello");
    }
  };
  runnable.run();
}
1.3 람다 사용
- 만약 FunctionalInterface라면 Anonymous Class보다 람다식을 이용하는 것이 훨씬 간편하다
- 그러나 람다가 몇 줄 이상으로 길어진다면 람다 보다는 코드가 수행하는 일을 잘 설명하는 이름을 가진 메서드를 정의하고 메소드 참조를 활용하는 것이 좋다
- 코드의 명확성이 우선!
Runnable 인터페이스의 익명 구현 객체를 람다식으로 생성하는 코드
@Test
void testRunnableLambda() {
  Runnable runnable = () -> System.out.println("hello");
  runnable.run();
}
- 람다식은
(매개변수) -> {실행코드}형태로 작성되며 런타임시에 인터페이스의 익명 구현 객체로 생성된다. - 위 코드는 Runnable 변수에 대입되므로 람다식은 Runnable의 익명 구현 객체를 생성하게 된다.
1.4 람다의 특징
- 람다 표현식은 익명 함수를 단순화한 것
- 익명: 보통의 메서드와 달리 이름이 없으므로 익명이라 표현한다
- 함수: 람다는 메소드 처럼 특정 클래스에 종속되지 않으므로 함수라고 부른다
- 전달: 람다 표현식을 메서드 인수로 전달하거나 변수로 지정할 수 있다
- 간결성: 익명 클래스처럼 많은 자질구레한 코드를 구현할 필요가 없다
1.5 Anonymous Class와 비교
- 익명 클래스에서
this는 익명클래스 자신을 가리키지만 람다에서this는 람다를 감싸는 클래스를 카리킨다 - 익명 클래스는 감싸고 있는 클래스의 변수를 가릴수 있지만 람다는 그렇지 못하다
- 익명 클래스를 람다 표현식으로 바꾸면 콘텍스트 오버로딩에 따른 모호함이 초래될 수 있다
예시
Runnable과 같은 시그니처를 가지는 함수형 인터페이스 Task를 선언한다
interface Task {
  void execute();
}
아래와 같이 정적 메소드가 오버로딩 되어 있다
public static void doSomething(Runnable r){
  r.run();
}

public static void doSomething(Task t){
  t.execute();
}
Task를 구현한 익명 클래스 전달하기
doSomething(new Task() {
  @Override
  public void execute() {
    System.out.println("Danger danger!");
  }
});
익명 클래스를 람다로 바꾸면
- Runnable과 Task 모두 대상 형식이 되므로 문제가 생긴다
- 즉 doSomething(Runnable r) 과 doSomething(Task t) 어느것을 가리키는지 알수 없다
doSomething(() -> System.out.println("Danger danger!"));
따라서 아래와 같이 명시적 형변환을 이용한다
doSomething((Task) () -> System.out.println("Danger danger!"));
2 Lambda의 기본 문법
(타입 매개변수, ...) -> {실행문; ...}
타입 매개변수
- 인자가 없을 때: ()
- 인자가 한개일 때: (one) 또는 one
- 인자가 여러개 일 때: (one, two)
- 인자의 타입은 생략 가능
- 컴파일러가 추론하지만 명시할 수도 있다. (Integer one, Integer two)
실행문
- 화살표 오른쪽에 함수 본문을 정의한다.
- 여러 줄인 경우에
{ }를 사용해서 묶는다. - 한 줄인 경우:
{ }생략 가능,return도 생략 가능.- 예)
(x, y) -> x + y - 중괄호
{ }안에 return문만 있을 경우 위와 같이 생략하는 것이 정석이다.
- 예)
3 Functional Interface
- 모든 인터페이스를 람다식의 타겟 타입으로 사용할 수 없다
- 두 개 이상의 추상 메서드가 선언된 인터페이스는 람다식을 이용해서 구현 객체를 생성할 수 없다.
- 하나의 추상 메서드가 선언된 인터페이스만이 람다식의 타켓 타입이 될 수 있다
- 이러한 인터페이스를 함수적 인터페이스(functional interface)라고 한다.
@FunctionalInterface를 인터페이스에 적용하면 두 개 이상의 추상 메서드가 선언되지 않도록 컴파일 시점에 체킹할 수 있다.
@FunctionalInterface 어노테이션이 사용된 예시
@FunctionalInterface어노테이션은 선택사항이다.- 이 어노테이션이 없더라도 하나의 추상 메서드를 가진다면 모두 Functional Interface이다.
- 그러나 실수로 두 개 이상의 추상메서드를 선언하는 것을 방지하기 위해 이 어노테이션을 사용한다.
@FunctionalInterface
public interface Runnable {
       public abstract void run();
}
4 형식 검사, 형식 추론
- 람다 표현식은 Functional Interface의 인스턴스를 만든다.
- 그러나 람다식 자체에는 어떤 함수형 인터페이스를 구현하는지 정보가 포함되어 있지 않다.
4.1 형식 검사
- 람다가 사용되는 컨텍스트를 이용해서 람다의 형식을 추론할 수 있다.
- 컨텍스트: 람다가 전달될 메서드 파라미터, 람다가 할당되는 변수
형식 검사 과정 예시
public static List<Apple> filter(List<Apple> inventory, Predicate<Apple> p) {
  List<Apple> result = new ArrayList<>();
  for (Apple apple : inventory) {
    if (p.test(apple)) {
      result.add(apple);
    }
  }
  return result;
}
List<Apple> greenApples = filter(inventory, (Apple a) -> a.getColor() == Color.GREEN);
- filter 메소드의 선언을 확인한다
- filter 메소드는 두 번째 파라미터로
Predicate<Apple>형식(대상 형식)을 기대한다 Predicate<Apple>은 test라는 한 개의 추상 메서드를 정의하는 함수형 인터페이스다- test 메서드는 Apple을 받아 boolean을 반환하는 함수 디스크립터를 묘사한다
- filter 메서드로 전달된 인수는 이와 같은 요구 사항을 만족해야 한다
- 함수 디스크립터: Apple -> boolean
- 람다의 시그니처와 일치하므로 형식 검사 성공
- (
Apple a) -> a.getColor() == Color.GREEN) - Apple -> boolean
- (
함수 디스크립터
함수형 인터페이스의 추상 메서드 시그니처를 함수 디스크립터라고 한다.
4.2 형식 추론
- 위에 코드를 더 단순화하는 방법이 있다
- 자바 컴파일러는 람다 표현식인 사용된 컨텍스트(대상 형식)를 이용해 람다 표현식과 관련된 함수형 인터페이스를 추론할 수 있다
- 대상 형식:
Comparator<Apple>
- 대상 형식:
- 대상 형식을 알기 때문에 함수형 인터페이스의 추상 메서드 시그니처(함수 디스크립터)를 알 수 있다
- 따라서 함수형 인터페이스의 파라미터 형식에 접근할 수 있으므로 람다 문법에서 이를 생략할 수 있다.
- 상황에 따라 명시적으로 표현하는 것이 좋고 형식을 배제하는 것이 가독성을 향상시킬 때도 있다. 규칙은 없다
예시
// 형식 명시
Comparator<Apple> c = (Apple a, Apple b) -> a.getWeight().compareTo(b.getWeight());
// 형식 추론
Comparator<Apple> c = (a, b) -> a.getWeight().compareTo(b.getWeight());
5 표준 API의 함수형 인터페이스
- Java가 기본으로 제공하는 함수형 인터페이스
- java.lang.funcation 패키지
- 자바에서 미리 정의해둔 자주 사용할만한 함수 인터페이스
- Function, BiFunction, Consumer, Supplier, Predicate, UnaryOperator, BinaryOperator이 있다
- 구분 기준은 인터페이스에 선언된 추상 메서드의 매개값과 리턴값의 유무이다.
- 참조형이 아닌 기본형 특화 함수형 인터페이스도 제공한다.
- 기본형 특화 함수형 인터페이스를 사용하면 오토 박싱 동작을 피할 수 있다
- 예)
IntPredicate:Predicate<Integer>와 달리1000(int)이라는 값을Integer로박싱하지 않는다
5.1 Function
@FunctionalInterface
public interface Function<T, R> {
  R apply(T t);

  default <V> Function<V, R> compose(Function<? super V, ? extends T> before) {
    Objects.requireNonNull(before);
    return (V v) -> apply(before.apply(v));
  }

  default <V> Function<T, V> andThen(Function<? super R, ? extends V> after) {
    Objects.requireNonNull(after);
    return (T t) -> after.apply(apply(t));
  }
}
R apply(T t): T 타입을 받아서 R 타입을 리턴하는 함수 인터페이스- 주로 매개값을 리턴값으로 매핑(타입변환)하는데 사용
Function의 순차적 연결
- Function 함수적 인터페이스는 먼저 실행한 함수적 인터페이스의 결과 값을 다음 함수적 인터페이스의 매개값으로 넘겨주고 최종 결과를 리턴한다.
Function<Member, Address>와Function<Address, String>을 순차적으로 연결하면Function<Member, String>을 만들 수 있다.
public class FunctionAndThenTest {
  public static void main(String[] args) {
    Function<Member, Address> memberToAddress = (member) -> member.getAddress();
    Function<Address, String> addressToCityString = (address) -> address.getCity();

    Address address = new Address("경기도", "탄천상로");
    Member member = new Member("노영삼", address);

    // Function<Member, Address> andThen Function<Address, String> = Function<Member, String>
    Function<Member, String> memberToCityString = memberToAddress.andThen(addressToCityString);
    String city = memberToCityString.apply(member);
    System.out.println("city: " + city);

    // Function<Address, String> compose Function<Member, Address> = Function<Member, String>
    memberToCityString = addressToCityString.compose(memberToAddress);
    city = memberToCityString.apply(member);
    System.out.println("city: " + city);
  }
}
5.2 BiFunction
@FunctionalInterface
public interface BiFunction<T, U, R> {
  R apply(T t, U u);
  ...
}
R apply(T t, U u): 두 개의 값(T, U)를 받아서 R 타입을 리턴하는 함수 인터페이스
5.3 Consumer
@FunctionalInterface
public interface Consumer<T> {
  void accept(T t);

   default Consumer<T> andThen(Consumer<? super T> after) {
        Objects.requireNonNull(after);
        return (T t) -> { accept(t); after.accept(t); };
    }
}
void Accept(T t): T 타입을 받아서 아무값도 리턴하지 않는 함수 인터페이스
Consumer의 순차적 연결
- Consumer는 리턴이 없기 때문에 andThen()은 함수적 인터페이스의 호출 순서만 정한다.
public class ConsumerAndThenTest {
    public static void main(String[] args) {
        @Setter
        @Getter
        class Student {
            String name;
            int score;
        }

        Student student1 = new Student();
        student1.setName("노영삼");
        student1.setScore(100);

        Student student2 = new Student();
        student2.setName("김영삼");
        student2.setScore(85);

        Student[] students = {student1, student2};

        Consumer<Student> studentName = (student) -> {
            System.out.println("이름: " + student.getName());
        };

        Consumer<Student> studentScore = (student) -> {
            System.out.println("점수: " + student.getScore());
        };

      	// Consumer 인테페이스의 호출 순서를 이름 먼저 출력하고 점수를 출력하도록
        Consumer<Student> studentNameAndScore = studentName.andThen(studentScore);

        for (Student student : students) {
            studentNameAndScore.accept(student);
        }
    }
}
이름: 노영삼
점수: 100
이름: 김영삼
점수: 85
5.4 Supplier
@FunctionalInterface
public interface Supplier<T> {
    T get();
}
T get(): T 타입의 값을 제공하는 함수 인터페이스
5.5 Predicate
- 수학에서는 인수로 값을 받아 true나 false를 반환하는 함수를 Predicate이라고 한다.
Function<Object, Boolean>과 같이 코드를 구현할 수 있지만Predicate<Object>를 사용하는 것이 더 표준적인 방식이다- 또한
boolean을Boolean으로 변환하는 과정도 없다
- 또한
Predicate 인터페이스
@FunctionalInterface
public interface Predicate<T> {
  boolean test(T t);

  default Predicate<T> and(Predicate<? super T> other) {
    Objects.requireNonNull(other);
    return (t) -> test(t) && other.test(t);
  }

  default Predicate<T> or(Predicate<? super T> other) {
    Objects.requireNonNull(other);
    return (t) -> test(t) || other.test(t);
  }

  default Predicate<T> negate() {
    return (t) -> !test(t);
  }

  ...
}
boolean test(T t): 타입을 받아서 boolean을 리턴하는 함수 인터페이스
Predicate 사용 예시
- and(), or() 메소드를 이용해 Predicate를 순차적으로 연결할 수 있다
import org.assertj.core.api.Assertions;
import org.junit.jupiter.api.Test;

import java.util.function.IntPredicate;

public class PredicateTest {
  IntPredicate isMultipleOfTwo = (num) -> num % 2 == 0;
  IntPredicate isMultipleOfThree = (num) -> num % 3 == 0;

  @Test
  void testAnd() {
    IntPredicate isMultipleOfTwoAndThree = isMultipleOfTwo.and(isMultipleOfThree);
    boolean result = isMultipleOfTwoAndThree.test(6);
    Assertions.assertThat(result).isTrue();
  }

  @Test
  void testOr() {
    IntPredicate isMultipleOfTwoOrThree = isMultipleOfTwo.or(isMultipleOfThree);
    boolean result = isMultipleOfTwoOrThree.test(5);
    Assertions.assertThat(result).isFalse();
  }

  @Test
  void testNegate() {
    IntPredicate isNotMultipleOfTwo = isMultipleOfTwo.negate();
    boolean result = isNotMultipleOfTwo.test(5);
    Assertions.assertThat(result).isTrue();
  }
}
5.6 UnaryOperator
@FunctionalInterface
public interface UnaryOperator<T> extends Function<T, T> {
  ...
}
- Function의 특수한 형태로, 입력값 하나를 받아서 동일한 타입을 리턴하는 함수 인터페이스
5.7 BinaryOperator
@FunctionalInterface
public interface BinaryOperator<T> extends BiFunction<T,T,T> {
  ...
}
- BiFunction의 특수한 형태로, 동일한 타입(T)의 입렵값 두개를 받아 T 타입을 리턴하는 함수 인터페이스
6 클래스 멤버와 로컬 변수 사용
6.1 클래스의 멤버 사용
- 람다 안에서 클래스 멤버인 필드와 메소드를 제약없이 사용할 수 있다.
- 단,
this의 사용에 주의해야 한다.- 람다식 내부의
this는 내부적으로 생성되는 익명 객체의 참조가 아니라 람다식을 실행한 객체의 참조이다 - 외부 객체의
this를 사용하고 싶다면,외부 객체명.this를 이용하면 된다.
- 람다식 내부의
@FunctionalInterface
public interface MyFunctionalInterface {
  void method();
}

public class UsingThis {
  public int outerField = 10;

  class Inner {
    int innerField = 20;

    void method() {
      MyFunctionalInterface mfi = () -> {
        // 람다식 내부에서 this는 Inner 클래스의 객체를 의미한다.
        System.out.println("outerField: " + outerField);
        // System.out.println("outerField: " + this.outerField); 컴파일 에러
        // 바깥 객체의 참조를 얻기 위해서는 클래스명.this를 사용한다.
        System.out.println("outerField: " + UsingThis.this.outerField);

        System.out.println("innerField: " + innerField);
        System.out.println("innerField: " + this.innerField);
      };
      mfi.method();
    }
  }
}
6.2 로컬 변수 사용
- 람다식은 메소드 내부에 작성되기 때문에 이름이 없는 Local Class라고 생각할 수 있다.
- 따라서 Local Class 같이 바깥 클래스의 모든 멤버(인스턴스, static 멤버)에 접근이 가능하다
- 또한 람다식은 로컬 변수와 메소드의 파라미터에 접근도 가능하다
- 다만 로컬 변수와 매개변수는 final로 선언되거나
effectively final이어야 한다. effectively final: 변수 혹은 파라미터가 초기화 이후 변하지 않은 경우
- 다만 로컬 변수와 매개변수는 final로 선언되거나
로컬 변수와 매개변수는 final로 선언되거나 effectively final이어야 하는 이유
-
로컬 클래스의 객체는 메소드 실행이 끝나도 힙 메모리에 존재해서 계속 사용할 수 있다.
-
그러나 로컬 변수와 매개 변수는 메소드 실행이 끝나면 스택 메모리에서 사라져 로컬 객체에서 사용할 경우 문제가 된다.
-
로컬 클래스에서 사용하는 매개 변수나 로컬 변수의 값을 로컬 클래스 내부에 복사해 두고 사용한다.
- 이와 같은 동작을 람다 캡처링이라고 부른다
-
매개 변수나 로컬 변수가 수정되어 값이 변경되면 로컬 클래스에 복사해둔 값과 달라지는 문제를 해결하기 위해 매개 변수나 로컬 변수를 final로 선언해서 수정을 막는다.
-
자바 8이후 final로 선언하지 않아도 로컬 변수가
effectively final이라면 접근 가능하다.effectively final: 변수 혹은 파라미터가 초기화 이후 변하지 않은 경우- final 키워드가 있다면 로컬 클래스의 메소드 내부에 지역 변수로 복사
- final 키워드가 없다면 로컬 클래스의 필드로 복사된다.
effectively final 예시
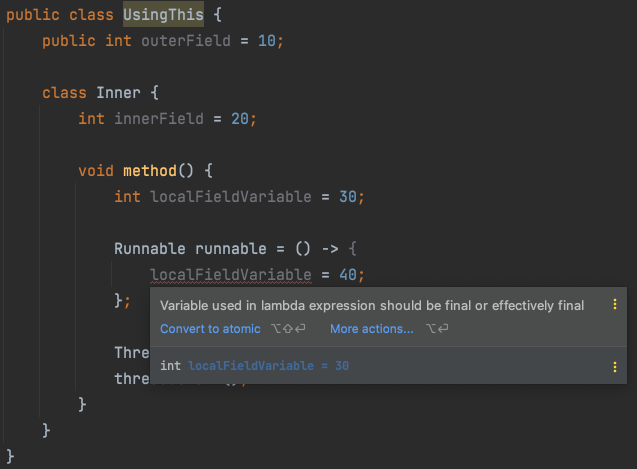
- 아래의 코드와 같이 람다식 에서 참조하는 지역변수
localFieldVariable이 final키워드 없이 선언되었기 때문에effectively final해야한다. - 그런데 람다식 안에서
localFieldVariable를 변경하면 더 이상effectively final하지 않기 때문에 컴파일 에러가 발생한다.
 .
.
로컬 변수 사용 예시
localFieldVariable은 초기화 이후 변하지 않았기 때문에effectively final하다- 따라서
localFieldVariable은 클래스의 필드로 복사되어 참조가 가능하다. - 아래의 코드에서 메소드가 끝난 이후에도
thread는 계속 실행되며localFieldVariable을 계속 참조한다.
public class UsingThis {
  public int outerField = 10;

  class Inner {
    int innerField = 20;

    void method() {
      int localFieldVariable = 11;

      Runnable runnable = () -> {
        for (int i = 0; i < 10; i++) {
          try {
            Thread.sleep(1000);
            System.out.println("thread implemented by lambda expression is running");
            System.out.println("localFieldVariable is " + localFieldVariable);
          } catch (InterruptedException e) {
            e.printStackTrace();
          }
        }
      };

      Thread thread = new Thread(runnable);
      thread.start();

      System.out.println("Method is already over");
    }
  }
}
7 메소드 참조(Method Reference)
-
메소드 참조란 말 그대로 메소드를 참조해서 매개 변수의 정보 및 리턴 타입을 알아내어 람다식에서 불필요한 변수를 제거하는 것이 목적이다.
-
이미 정의된 메소드를 참조해서 사용한다.
-
때로는 람다 표현식보다 메서드 참조를 사용하는 것이 더 가독성이 좋다
- 메소드명으로 코드의 의도를 명확히 알릴 수 있다
-
메소드 참조에는 아래와 같이 4가지의 종류가 있다.
7.1 정적 메소드 참조
ContainingClass::staticMethodName
(args) -> ClassName.staticMethod(args)
ClassName::staticMethod
7.2 인스턴스 메소드 참조
containingObject::instanceMethodName
(args) -> expr.instanceMethod(args)
expr::instanceMethod
7.3 임의 인스턴스 메소드 참조
ContainingType::methodName- 람다식에 매개변수로 주어진 객체의 메소드를 참조하는 것
(arg0, rest) -> arg0.instanceMethod(rest)
ClassName::instanceMethod
7.4 생성자 참조
ClassName::new
7.5 예시
import java.util.function.BiFunction;

public class MethodReferencesExamples {

    public static <T> T mergeThings(T a, T b, BiFunction<T, T, T> merger) {
        return merger.apply(a, b);
    }

    public static String appendStrings(String a, String b) {
        return a + b;
    }

    public String appendStrings2(String a, String b) {
        return a + b;
    }

    public static void main(String[] args) {

        MethodReferencesExamples myApp = new MethodReferencesExamples();

        // Calling the method mergeThings with a lambda expression
        System.out.println(MethodReferencesExamples.
            mergeThings("Hello ", "World!", (a, b) -> a + b));

        // Reference to a static method
        System.out.println(MethodReferencesExamples.
            mergeThings("Hello ", "World!", MethodReferencesExamples::appendStrings));

        // Reference to an instance method of a particular object
        System.out.println(MethodReferencesExamples.
            mergeThings("Hello ", "World!", myApp::appendStrings2));

        // Reference to an instance method of an arbitrary object of a particular type
        System.out.println(MethodReferencesExamples.
            mergeThings("Hello ", "World!", String::concat));
    }
}
참고
- 이것이 자바다(이상민 저)
- 모던 자바 인 액션
- https://docs.oracle.com/javase/tutorial/java/javaOO/methodreferences.html